
What Is an Order Block in Forex? The SMC Guide for Beginners

You’ve placed the trade. The setup looked clean. Market structure was right, the level was clear, your entry made sense — and then price swept straight through it and reversed without you.
If that sounds familiar, there’s a good chance you were trading support and resistance the way retail traders are taught. And there’s an equally good chance that a few candles away from where you entered, an order block was sitting quietly, doing exactly what institutional traders built it to do.
Order blocks are one of the most searched concepts in Smart Money Concepts (SMC) trading — and one of the most misunderstood. This guide breaks them down from first principles: what they actually are, why they form, how to find them on a live chart, and how to trade them with a defined entry, stop, and target.
What Is an Order Block?
An order block is a specific area on a price chart where a large institution — a bank, hedge fund, or central bank desk — placed a significant volume of buy or sell orders before a strong, impulsive price move.
The key insight is this: institutions can’t fill a $500 million position in a single candle without moving the market against themselves. So instead of dumping their entire position at one price, they spread their orders across a small zone — accumulating quietly before the big move. That accumulation zone is the order block.
When price returns to that zone later, the institution’s remaining unfilled orders are still sitting there, waiting to be executed. That’s why price so consistently reacts at order blocks — it’s not a coincidence or a self-fulfilling prophecy. It’s the mechanical result of pending institutional orders still resting in that price area.
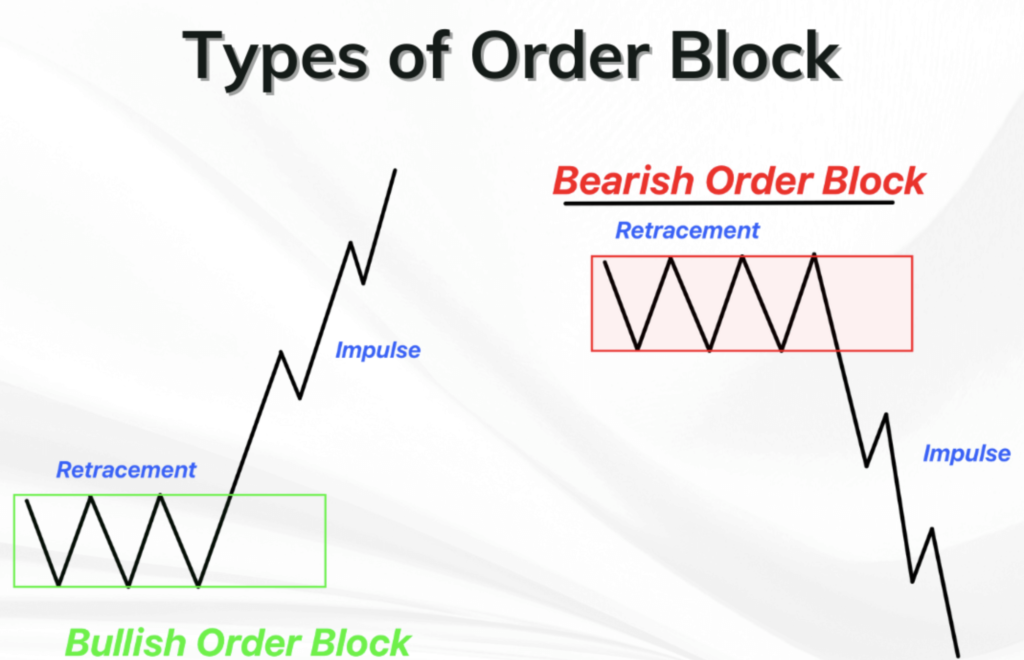
In ICT (Inner Circle Trader) terms, the definition is more specific:
- A bullish order block is the last bearish (down) candle before a strong, impulsive move upward.
- A bearish order block is the last bullish (up) candle before a strong, impulsive move downward.
That single candle — or sometimes a small cluster of candles — represents the final moment of institutional accumulation before they revealed their hand and pushed the market.
Why Order Blocks Work: The Institutional Logic
To really understand order blocks, you need to understand the problem institutions face that retail traders don’t.
If you want to buy 10 lots of XAUUSD, you place the trade and it fills instantly. If a major bank wants to buy the equivalent of $1 billion in gold, executing that in one go would spike the price immediately, making their average entry far worse. Their own buy order becomes their biggest cost.
So instead, they do something smarter. They engineer liquidity. Before accumulating long positions, they push price down briefly — triggering the stop losses of retail long traders and activating the sell orders of retail short traders. All those triggered orders create the volume the institution needs to fill their own buy orders at the price they want, without pushing price against themselves.
That brief push downward — the final bearish candle before the explosive rally — is the bullish order block. It’s the institutional entry zone in disguise.
This is why order blocks look like they shouldn’t be support levels when you first see them. They were bearish candles. They looked like selling. And that’s precisely the point — institutions needed them to look like selling so they could accumulate quietly.
Bullish Order Blocks: How to Identify Them
A bullish order block forms in the context of an uptrend or at a major area of demand. Here’s the exact sequence to look for:
Step 1 — Identify the trend or HTF bias. You should only be looking for bullish order blocks when the higher timeframe structure is bullish. If the daily chart is making higher highs and higher lows, you’re in an uptrend. You want to buy — so you’re hunting bullish order blocks.
Step 2 — Look for a pullback into a prior area of interest. Price pulls back from a swing high, moving against the trend. This pullback is where the order block will form.
Step 3 — Find the last bearish candle before the next impulsive move up. Within that pullback, identify the final red (bearish) candle before price turned and drove upward aggressively. That candle — specifically, the full body of that candle from open to close — is your bullish order block zone.
Step 4 — Confirm with a Break of Structure (BOS). A valid order block must result in a genuine break of structure — meaning price, after leaving the zone, broke through a prior swing high. If price just drifted up without breaking structure, the block doesn’t carry the same weight.
What the zone looks like on a chart: You’ll draw a rectangle from the open of that bearish candle to its close (some traders use the full high-to-low wick, but the body is the primary zone). That rectangle is your bullish order block. When price returns to it, you’re looking for a long entry.
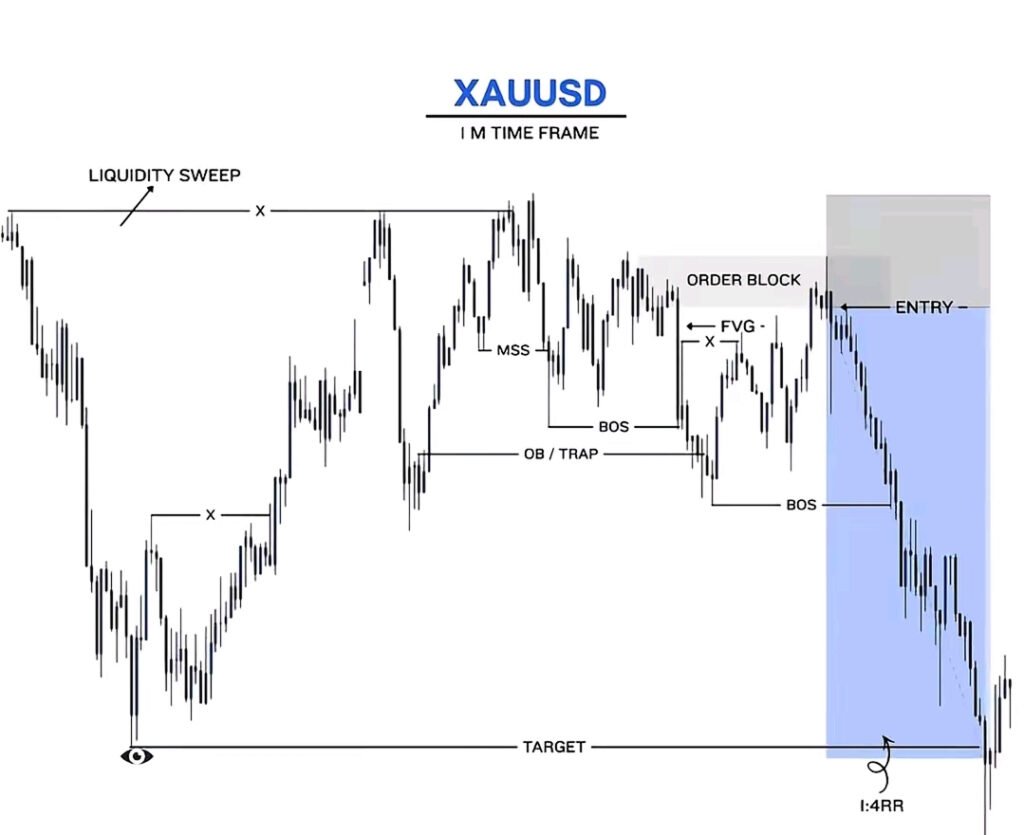
A Real XAUUSD Example
Imagine gold on the H4 chart is in a clear uptrend. Price pulls back from a swing high of $2,380, dropping to around $2,310 over three sessions. Within that pullback, the final red candle prints from $2,318 down to $2,304 — and then, the next candle explodes upward, eventually breaking the prior swing high at $2,380. That last red candle, from $2,318 to $2,304, is your bullish order block.
When price later returns to the $2,304–$2,318 zone, that’s where institutional buy orders are waiting. That’s your setup.
Bearish Order Blocks: How to Identify Them
Bearish order blocks are the mirror image, forming in downtrends or at major supply areas.
Step 1 — Confirm a downtrend on the higher timeframe. The daily or H4 chart should be making lower highs and lower lows. You’re biased short.
Step 2 — Wait for a pullback against the trend (a rally upward). Price bounces from a swing low, moving up against the downtrend.
Step 3 — Find the last bullish candle before the next impulsive drop. Within that rally, the final green (bullish) candle before price reversed and fell hard is your bearish order block. The body of that candle — from open to close — defines the zone.
Step 4 — Confirm with a Break of Structure downward. The move away from the zone should have broken a prior swing low. No BOS, no valid block.
Trading the bearish order block: When price rallies back into that zone on a retest, you’re looking for short entries. The institution’s sell orders are still sitting in that price area, and price will tend to react when it touches that zone again.
How to Trade Order Blocks: Entry, Stop Loss, and Target
Identifying the zone is only half the work. Trading it with proper structure is what separates profitable use of order blocks from simply staring at rectangles on a chart.
Entry
There are three common approaches, from most aggressive to most conservative:
- Limit order at the zone boundary. Place a buy limit at the top of a bullish order block (or sell limit at the bottom of a bearish one) before price even arrives. Higher reward potential, but more risk if the zone fails.
- Wait for price to enter the zone, then look for lower timeframe confirmation. Drop to the M15 or M5 chart. Wait for a Change of Character (CHoCH) — a small structure shift within the lower timeframe — before entering. This is the most widely used approach.
- Enter at the 50% retracement of the block. Many institutional traders use the midpoint of the order block as a refined entry, particularly in ICT methodology. This gives you a tighter stop with better R:R.
Stop Loss
Your stop loss should be placed just beyond the opposite end of the order block, at a level that fully invalidates the trade idea.
For a bullish order block: stop goes just below the low of the order block candle (a few pips of buffer below the wick). If price closes below that level, the order block is broken, and your thesis is wrong.
For a bearish order block: stop goes just above the high of the order block candle.
Never place your stop inside the order block zone — you’ll get stopped out by the normal wicking behaviour that happens as price tests the zone before reacting.
Target
Your take profit targets should be at the next significant liquidity pool — the obvious highs and lows where retail stop orders are clustered. In an uptrend, that means the prior swing high, or if you’re on a lower timeframe, the high that was formed before the pullback began. Aim for a minimum 1:2 risk-to-reward ratio. Many clean order block setups offer 1:3 or better when properly aligned with HTF structure.
What Makes an Order Block More Reliable
Not all order blocks are equal. Here are the factors that increase a zone’s reliability:
Higher timeframe alignment. An H4 order block aligned with a D1 trend carries far more weight than a 5-minute order block sitting against the higher timeframe bias. Always trade order blocks in the direction of your HTF structure.
Confluence with a Fair Value Gap (FVG). When an order block coincides with an FVG — a price imbalance left by the impulsive move — the combination creates a very high-probability zone. This is because both the institutional orders in the OB and the price imbalance of the FVG are pulling price back to the same area. On XAUUSD, OB + FVG confluences are among the cleanest setups you’ll find.
Confluence with liquidity. If a bullish order block sits just below a pool of obvious retail stop losses — like equal lows or a visible swing low — institutions have two reasons to push price there: to fill their own orders and to sweep the retail liquidity below. The combination is extremely powerful.
Fresh vs. mitigated blocks. An order block is “fresh” if price has not returned to it since it formed. The first retest of a fresh order block is statistically the strongest reaction. Once a block has been tested multiple times, its reliability decreases — the institutional orders in that zone are progressively filled with each visit.
Session timing. An order block being retested during the London Kill Zone or New York session overlap carries more conviction than the same setup during the Asian session. Volume matters. Order blocks that are tested in dead-hour, low-liquidity conditions often produce fake reactions.
Common Mistakes Beginners Make with Order Blocks
Trading against the HTF trend. Looking for long entries from bullish order blocks when the daily chart is in a clear downtrend is one of the most common and costly mistakes. Order blocks work best when they’re trade flow — in the direction of the dominant institutional trend.
Treating every bearish candle as a bullish order block. The candle must be the last bearish candle before a genuine, impulsive, structure-breaking move. A random red candle in consolidation is not an order block. The impulse move away from it — and the resulting BOS — is what validates it.
Ignoring whether the block has already been mitigated. If price has already returned to and bounced from an order block once, its power is reduced. Never trade a block on its third or fourth retest expecting the same reaction as the first.
Placing entries without lower timeframe confirmation. Dropping to a lower timeframe — M15 or M5 — to look for a structural confirmation before entering significantly improves win rate. Blindly limit-ordering into a zone and hoping for the best is not a strategy.
Order Blocks on XAUUSD: Why Gold Is One of the Best Markets
Gold is one of the clearest markets in the world for order block trading, for two reasons.
First, institutional participation in XAUUSD is extremely high. The bullion banks, central banks, and hedge funds that dominate gold trading are exactly the kind of players who create the large-volume accumulation zones that become order blocks. Their footprints are visible — and they repeat.
Second, gold’s daily range (often 200–500+ pips) means that when an order block holds, the resulting move provides excellent risk-to-reward opportunities. A 15-pip stop below a bullish OB can target a 60–90 pip move to the next swing high — ratios that are difficult to achieve on tighter-ranging pairs.
At Smart Forex Pips, every daily XAUUSD and EURUSD analysis is built around identifying the key order blocks active on the current timeframe, the liquidity pools above and below, and the session timing that makes the setup worth taking.
If you want to see exactly how we map and trade order blocks on live gold charts every day, join the free Smart Forex Pips Telegram channel — and if you want the blocks plotted automatically on your TradingView charts, the Smart Forex Pips indicator does exactly that.
Join the free Telegram channel → HERE
Get the Smart Forex Pips TradingView indicator → HERE
Summary: What You Need to Remember
An order block is a price zone where institutions accumulated orders before a strong, directional move. The bullish order block is the last red candle before a rally. The bearish order block is the last green candle before a drop. When price returns to those zones, the remaining institutional orders provide fuel for the next move in the original direction.
To trade them effectively: confirm your HTF bias first, wait for a fresh, unmitigated block aligned with the trend, look for lower timeframe confirmation on the retest, place your stop just beyond the block’s boundary, and target the next liquidity pool with at least a 1:2 R:R.
Order blocks aren’t magic. They’re the logical consequence of how large capital moves through financial markets. Once you understand that logic, you stop fighting institutional order flow — and start trading with it.